How best to learn lightroom

Messages
292
Name
Dom
Edit My Images
Yes
Hi all,

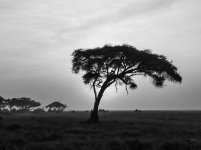
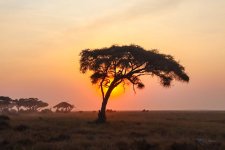
I’ve recently returned from a trip to Kenya and got some pictures on safari that I’m pretty happy with. They’re certainly not up to the standard of some of you guys, but for a rank amateur I’m quite happy.

I’d love to be able to enhance them using lightroom or photoshop so I’ve bought the monthly package, but I was wondering the best way to learn how to use it.

Whats the best way to learn post processing using the photos I’ve taken?

TIA
 
I was wondering the best way to learn how to use it.

Whats the best way to learn post processing using the photos I’ve taken?

For me personally it's through video, why ? because books get dated, and because Lightroom is always advancing, particularly the last few years, videos on youtube and elsewhere are constantly updated too. some of my favorites are Colin Smith, Pixim perfect, Anthony Morganti, and Scott Kelby ( not necessarily in that order ) their are loads more, but they are my normal to go too.
 
I started with Anthony Morganti's videos. At that time he was heading down a particular stylistic rabbit hole, but the information was still good, and gave me enough to apply my own preferences.
 
I think it partly depends what form of learning suits you. Some prefer classroom type tuition, one to one tuition, books, videos etc. I find LR intuitive but struggle with PS partly because I don’t use it enough.

Once I knew the basics of LR I just used it and consulted books and videos when necessary. Several of the books are regularly updated. I find Lightroom Queen to be good.
 
I would say video & YT is probably the easiest generally.

Personally I'd just start with a LR import - I import straight from camera into the relevant folder on the external drive - LR then transfers from the SD to PC & they are in LR ready to edit. The bonus with LR is that editing is non-destructive so at anytime you can hit 'reset' & revert back to as shot with no damage to the file. Export as jpeg when happy :)

Just start with the basics to begin with - most of which you can probably work out yourself by sliding the.... sliders :)
 
I think it partly depends what form of learning suits you. Some prefer classroom type tuition, one to one tuition, books, videos etc. I find LR intuitive but struggle with PS partly because I don’t use it enough.

Once I knew the basics of LR I just used it and consulted books and videos when necessary. Several of the books are regularly updated. I find Lightroom Queen to be good.
I’ve downloaded the Lightroom Queen guide. I think one of the problems I have is there seems to be so many ways to achieve the same or similar result…shadows, whites and blacks, dodge and burn, that thing where you drag a line down and can make it lighter at the top and darker at the bottom or vice versa. To my uneducated brain, they all seem very similar
 
To my uneducated brain, they all seem very similar
Well that's because they are, just like photoshop their can be several ways to achieve the same result, and that's not a bad thing, you just adopt which way works best for you, but having the choice is good, well it is INMHO.
 
It seems, from your initial post, that you want to do some fairly basic editing. Once you’ve mastered this you might want to use the more advanced capabilities of LR, that are evolving all the time.

Your initial needs include importing files and developing a structured storage regime. Then you will want to crop, straighten, sharpen, adjust colour/contrast etc.

I’d recommend https://photographylife.com/how-to-use-lightroom-a-tutorial-for-beginners/4 as a starting point. This will get you started with the basics.

Trying to find YouTube vids that meet your needs can be confusing if you haven’t grasped the basics first.
 
Last edited:
So here’s an example of a photo I took. As far as I can tell, there’s nothing unrecoverable although a lot of it is very dark. If I just up the exposure though, it loses the impact of the sun behind the tree. What would be the best way to get some detail in the grass and leaves of the tree whilst still keeping it quite dark and dramatic? HDR? Or a more traditional method?
image0.jpeg
 
So here’s an example of a photo I took. As far as I can tell, there’s nothing unrecoverable although a lot of it is very dark. If I just up the exposure though, it loses the impact of the sun behind the tree. What would be the best way to get some detail in the grass and leaves of the tree whilst still keeping it quite dark and dramatic? HDR? Or a more traditional method?
View attachment 432743

Probably best to try..... drop the highlights and boost the shadows, although not too much as it will go HDR looking. Next you are into the "masking" tools with a "sky" mask and a "subject" mask.

Another good editing tip - adjust the slider or effect to where you think it looks good, and then back it OFF a touch :)
 
Hi again,

So I've had a go at making some adjustments in Lightroom. I'd love to hear what you think, if I could do better etc. I'm not too concerned with critiques of the actual photo, I'm trying to concentrate on the post processing for now. Baby steps! :)
IMG_9039.jpg
 
I'd say you've done a good job with that, kept the atmosphere. The one 'obvious' thing I'd try would be to raise the white point to give it a bit more sparkle. If you hold the alt key while raising the whites, it will show you when you've blown the highlights. You can then back off to find a balance below that point.
 
So here’s an example of a photo I took. As far as I can tell, there’s nothing unrecoverable although a lot of it is very dark. If I just up the exposure though, it loses the impact of the sun behind the tree. What would be the best way to get some detail in the grass and leaves of the tree whilst still keeping it quite dark and dramatic? HDR? Or a more traditional method?
View attachment 432743

It really depends on what the camera settings were and if you take it in RAW?
I would probably crop this to a square (4x3) and maybe even switch it to monochrome.
Have a play with the sliders, especially shadows, exposure and just learn that way.

Youtube videos will also help.
 
I'd say you've done a good job with that, kept the atmosphere. The one 'obvious' thing I'd try would be to raise the white point to give it a bit more sparkle. If you hold the alt key while raising the whites, it will show you when you've blown the highlights. You can then back off to find a balance below that point.
Thanks! By white point do you mean white balance?
 
It really depends on what the camera settings were and if you take it in RAW?
I would probably crop this to a square (4x3) and maybe even switch it to monochrome.
Have a play with the sliders, especially shadows, exposure and just learn that way.

Youtube videos will also help.
It was taken in raw yes. I’ll have a play with it monochrome as well, but I do really like the colours in it.
 
Apologies if you didnt want this doing.

But this is with very minor tweaks, mainly shadows and exposure... and only done with a right click save of your image. you'll be able to do a lot more with the raw.

You also have a smudge on your sensor or lens, top right of your image.
 

Attachments

  • tree-2.jpg
    tree-2.jpg
    245.5 KB · Views: 16
  • tree-3.jpg
    tree-3.jpg
    381.4 KB · Views: 16
Last edited:
Hi again,

So I've had a go at making some adjustments in Lightroom. I'd love to hear what you think, if I could do better etc. I'm not too concerned with critiques of the actual photo, I'm trying to concentrate on the post processing for now. Baby steps! :)
View attachment 432768

I think I prefer the brighter sky of the first & the brighter foreground of the second :) Or maybe somewhere in between with the skies..... The second looks a bit 'muddy' imo

With the sun behind the tree though, it certainly needs to be in colour not mono.

AM mean the 'white point' as in the whites slider - If you hold the alt key as mentioned you get like a PS mask & it'll tell you if/where highlights are blown. It will also do the vice versa with blacks on the blacks slider.
 
Thanks! By white point do you mean white balance?

No - Below highlights and shadows sliders are 2 more - black and white - to set black and white points.
 
I think I prefer the brighter sky of the first & the brighter foreground of the second :) Or maybe somewhere in between with the skies..... The second looks a bit 'muddy' imo

With the sun behind the tree though, it certainly needs to be in colour not mono.

AM mean the 'white point' as in the whites slider - If you hold the alt key as mentioned you get like a PS mask & it'll tell you if/where highlights are blown. It will also do the vice versa with blacks on the blacks slider.
If you’re talking about the 2 that I’ve linked, the first is the ‘neat’ image with no adjustments, the second is with some alternations made with the basic sliders.

I was trying to brighten the foreground and get some detail in the grass whilst leaving the sky with the more vivid colours. Ideally I’d have liked to get some detail in the tree trunk and branches too, but the branches are so fine I can’t do it without a lot of ghosting.

Could the muddiness be because it’s a very compressed jpeg rather than the raw file?
 
Apologies if you didnt want this doing.

But this is with very minor tweaks, mainly shadows and exposure... and only done with a right click save of your image. you'll be able to do a lot more with the raw.

You also have a smudge on your sensor or lens, top right of your image.
Please don’t apologise for taking the time to try and help!

I think I’ve picked a tricky photo to work with to start with. Getting the balance between exposing the foreground and try and keeping those vivid colours is tough!

Thanks for pointing out the smudge, I had noticed it and fixed it.
 
If you’re talking about the 2 that I’ve linked, the first is the ‘neat’ image with no adjustments, the second is with some alternations made with the basic sliders.

I was trying to brighten the foreground and get some detail in the grass whilst leaving the sky with the more vivid colours. Ideally I’d have liked to get some detail in the tree trunk and branches too, but the branches are so fine I can’t do it without a lot of ghosting.

Could the muddiness be because it’s a very compressed jpeg rather than the raw file?

Yes. Your two images :) I just think the sky in the second edited image looks too dull & muddy - it needs a bit of pop which I think the first version has - but, obviously it's a personal taste & opinion :)
 
Probably completely the wrong thing to say on here - but I often simply start with 'Auto', then add a bit of vibrance and clarity (indeed, you can set up a preset for your favoured look). And then just play really. The more you play, the more you see what works for you.
 
Yes. Your two images :) I just think the sky in the second edited image looks too dull & muddy - it needs a bit of pop which I think the first version has - but, obviously it's a personal taste & opinion :)
What can I do about the muddiness?
 
Whats the best way to learn post processing using the photos I’ve taken?
Load 'em up (known as 'import'), bang the sliders about to see what happens. Hopefully you've shot in raw, not tif or jpg. Trust your gut. Wing it. Forget about training, just look something up when you feel there's a hitch. But quell any rash sense of triumph - review the same processed images at random a week or a month later ...

In 5 or 10 years you might be getting more reliably in the groove, unless you're an absolute natural. ;-)

But it's ok to revisit your interpretations - keep your raws with that in mind. It's a movable feast, & nothing need be held to be definitive, whether you seek a graphic statement or an expression of something natural.

Playtime! But effects are cheap - keep some kind of truth in mind.
 
Last edited:
As an overall change, or by adding a mask to the sky?
I just did that one on your photo as an overall change. But then I quite like silhouettes, so don't mind a slightly darker foreground. Masking the sky / non-sky can be a bit hit and miss sometimes - and runs the risk of overdoing it and leaving it looking unnatural. Good for 'bland' skies though - which yours isn't.
 
Hi again,

So I've had a go at making some adjustments in Lightroom. I'd love to hear what you think, if I could do better etc. I'm not too concerned with critiques of the actual photo, I'm trying to concentrate on the post processing for now. Baby steps! :)
View attachment 432768
Good - gives me a sense of being there!
 
I think your edit looks pretty good to me. But I wasn't there and only somebody who was there knows what the scene looked like to the eye. Only you know how you want it to look. I prefer to keep my edits close to what it looked like to me, but that's just my personal choice.
 
I'm in a similar position. Have watched loads of yt videos but there tends to be so much info in them that my ageing brain forgets the how to by the time I get to the pc. I bought the September edition of PhotoPlus mag for the free mag that came with it " The Ultimate Guide to Photography Post-Production" it goes from the very basics creating catologes and importing through to masking dodge and burn focus stacking etc.
It certainly heped me I can just look up what I want while at the pc
Oh that sounds interesting. I’ll have a look to see if it’s still available
 
I haven’t read all the comments above but my thoughts would be to learn how the DAM (digital asset management) works best. I.e importing, tagging,rating, file naming structure, how to move and find files with filters. After this learning how to use the basic sliders like contrast, highlight, shadows. Learn how to export files using different quality, size etc as most social media have restrictions. From this point on learn the more complex tools.
 
It helps to have a process. Just tweaking until you're happy is really time consuming.

There are lots of videos about the importing / organising / tagging process.

When it comes to developing a good rule is to start from the top and work down. Select the nearest profile to what suits the image - Camera Portrait or Camera Standard work as well as pretty much anything else.

Get the white balance 'right'

Tweak the exposure to get the upper midtones & highlights in the right zone.
Be cautious adjusting the whites. Sometimes whites are meant to be pure white.
Don't do too much with the contrast.
Adjust the blacks - most images need to have the blacks only just clipping. Hold down the Alt key while you adjust the blacks slider until you can just see some clipping regions
Adjust shadows and highlights sliders to suit.

Stay away from the texture, clarity & dehaze sliders. They're a quick way to ruin an image.
Be gentle with all the colour, saturation & vibrance sliders.

With experimentation you'll find some default settings for the sharpening & denoising which work on most images. Again, don't overdo it.

And that's it for basic development


There is a _lot_ more you could do - masking, colour tweaking, dodging & burning, whatever. They all fall into the realms of enhancement rather developing.
 
I prefer learning through reading tutorials and articles, not through watching videos, BUT everyone is so different! There are tons of videos explaining Lightroom instruments and techniques, so if you're fine with video content, just go for it.
 
I prefer the second image - a bit more open, detail in the shadows but they are still shadows, pleasingly punchy and not too gaudy.
 
Both of these work. There are often several or many valid interpretations of a photograph - ask anyone who has inhabited a darkroom, including many masters.

You may've used a gradient mask in the second?
 
Back
Top