Garry Edwards

Moderator
Messages
12,419
Name
Garry Edwards
Edit My Images
No
cactus_final.jpg
(No Ps, but cropped to shape)

The first two challenges called for a large light, close to the subject, that produced soft lighting (no clearly-defined shadows), and some of us have struggled a bit with that, so this challenge is the exact opposite – a small light, a long way away, with very dense shadows.

This is a very common technique with a lot of subjects, it’s used to skim across the surface of the subject, to reveal and emphasise its texture, which creates deep and dramatic shadows (which, if required, can be mitigated by using fill).

It does require a specific piece of gear, a honeycomb, but don’t let that put you off!

My honeycomb, called a grid by our American friends, fits into a standard reflector. It’s a bit special, I paid a fortune for it when I was working in a Manhattan advertising studio many years ago, it has an angle of either 2 or 3 degrees and they are no longer available at any price, but very cheap ones with a 10 or 20 degree angle are available, and will work just as well for this challenge, and maybe better.
honeycomb_10.jpg

And there are plenty of other options too. A snoot will have a honeycomb included, and so do most flashgun accessory kits, although the ones I’ve seen aren’t great.

What a honeycomb does is to direct the light through a lot of small tubes, this stops the light from spreading to areas where it isn’t wanted, and the side effect is that a lot of lighting power is lost in the process.

This is the first time I’ve used my honeycomb with my fancy new flash head, and I was disappointed to find that it doesn’t quite fit, which it should. China has managed to collect and bring back bits of the far side of the moon, so it’s a bit annoying that some Chinese companies don’t seem to be able to convert 7 1/8” to 18.1cm. . .
honeycomb.jpg
This quick iPhone shot illustrates the "tight fit" problem. The light was actually in the adjoining room, to gain a distance of 9', this distance was needed to minimise the light fall-off that the Inverse Square Law creates, so that there was almost equal lighting intensity reaching the subject and the reflector.

If you don’t have some kind of honeycomb then you can make one very easily to fit on a flashgun, you just need a few drinking straws and a rubber band or sellotape. The longer the straws, the more dramatic the effect. In a perfect world, straws that are black on the inside should be better than white. See post 14 in this thread https://www.talkphotography.co.uk/threads/speedlight-grids.640566/#post-7641586

Most, if not all good pubs have these straws, and I’m told that ‘Spoons do too, and you’ll only need a handful for use with a flashgun . . .

If you have some kind of continuous light then the same workaround applies, although you may need a high ISO to cope with the very low light level, and you may need to be careful not to leave the light switched on for too long, to avoid overheating – and, if you’re using a studio flash with a modelling lamp, turn the modelling lamp off as soon as you can, again to avoid the risk of overheating damage.

Anyway, my subject here is a cactus, a friend gave it to me and said something about it being hard and prickly on the outside and soft on the inside, just like me, but I have no idea what he was talking about

As always, the first decision is about the effect we want to achieve. We then arrange the set – once again I used my ubiquitous bit of white shiny plastic (but didn’t bother to clean off all the bits of earth). It may not look very white, that’s because very little light reached it.

Having arranged the subject, we then arrange the camera position and stick it on a tripod. The position of the light is dependent on the camera position and angle, so the light positioning is always the last thing we do.

In my example, the light was placed a long way from the subject, at a distance of about 9 feet. The reason for this was that as distance increases, the effect of the Inverse Square law reduces, so if the light is too close the fall-off of light will be too rapid.

Here we are, with just the honeycomb
honeycomb only.jpg
As you can see, the honeycombed light has really emphasised the texture, but has left us with one side that’s totally unlit.

So, I added a reflector, as close as possible and only just out of shot
_DSC7708.jpg
The reflector was another bit of white plastic, supported by a slightly-opened book, but could have been paper, card, a mirror, cooking foil or anything else that worked. And, because the light was so far away, the reflector has balanced the light pretty well. I could have moved the reflector a bit closer to get slightly more lighting balance, it’s all about what you want to achieve.

What else could I have done?

Well, I could have changed the reflector angle a bit, and bounced some of the reflected light on to a second reflector, but that’s a complicated way of doing things, and the reality is that it’s easier and better to add an on-axis weak fill light if we want to, but the terms of these challenges limit us to using just a single light.

The setup shot below shows how this would be done
image7.jpeg
Honeycombs are also used to create hairlights, and are used whenever we want to emphasise texture, they’re ideal for creating an accent light when photographing any subject that has a relief, such as coins, carved items, leatherwork and so on.

They’re also very useful for backlighting, because as long as the angle of incidence is greater than the spread of light, they cannot cause lens flare – or, to put it another way, if it’s a 10 degree honeycomb that’s pointing 15 degrees away from the lens, no problem.

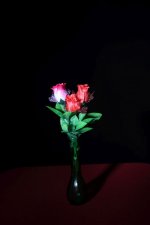
Here’s another of my examples, where only a honeycombed light was used
cartridges.jpg

So, over to you – a cactus, or any other subject that has a textured surface, take your pick

As with all of these challenges, what matters is the process, not the result.
 
This was taken with a Godox SK400 light with 7" reflector and 10 deg grid. The light diameter at the roses was about 10" in diameter from about 5' distance. No editing, other than reducing the file size, so I could post it here. The camera used, I believe, was either my Canon 90D or 77D (don't remember), and the photo was taken in my small home studio back in early December 2023.

Charley
 

Attachments

  • Roses In Vase  LoRes.jpg
    Roses In Vase LoRes.jpg
    45.5 KB · Views: 13
Bit of effort finding a suitable subject, but went for it with Batman ;)

XT-5 16-55 godox 685 on a cradle thing with No10 grid. 1/60th @ f8 iso 200. Flash on 1/4 power. White mountboard to push a bit of light back.

Setup
set up.jpg

SOC
TP lighting challenge Batman.jpg
 
My attempt
Fuji XT-1 18-135mm, f8 @180th Godox TT685 at half power and quarter power same grid and holder thing as Paul
Flash about 6ft from subject at about 20 degree angle with white card reflector behind subject.

Half Flash Power
p1014266025-4.jpg


Quarter Flash Power
p645400656-4.jpg


I am having difficulty getting rid of the shadow on the LHS, a bit of on axis flash helps but that's not allowed
 
This was taken with a Godox SK400 light with 7" reflector and 10 deg grid. The light diameter at the roses was about 10" in diameter from about 5' distance. No editing, other than reducing the file size, so I could post it here. The camera used, I believe, was either my Canon 90D or 77D (don't remember), and the photo was taken in my small home studio back in early December 2023.

Charley
Nice shot, honeycombs are great for this type of shot - but this challenge is more about using one to skim across the subject to emphasise the texture/shape

My attempt
Fuji XT-1 18-135mm, f8 @180th Godox TT685 at half power and quarter power same grid and holder thing as Paul
Flash about 6ft from subject at about 20 degree angle with white card reflector behind subject.

I am having difficulty getting rid of the shadow on the LHS, a bit of on axis flash helps but that's not allowed
Again, nice shot, but the light really needs to be coming from the side. Other than that, you've done a great job.
A fill light would help with the shadow, but so too would a reflector, it's a matter of personal taste really, but I don't think that a strong shadow looks out of place when there's hard lighting - If you photographed someone outdoors in bright sunlight then you've get a strong shadow as well as strong lighting, the two do really go together.
Bit of effort finding a suitable subject, but went for it with Batman ;)

XT-5 16-55 godox 685 on a cradle thing with No10 grid. 1/60th @ f8 iso 200. Flash on 1/4 power. White mountboard to push a bit of light back.
I think it's great, and possibly the ideal lighting for this type of subject. I think that the angle of the light is spot-on, but your would have got a more dramatic effect if it was further away, say on your patio. As it is, it's lost a fair bit of power covering Batman's width, due to the effect of the Inverse Square Law, and which has also reduced the effect of the reflector.

My personal view (which may be wrong) is that the reflector should be angled upwards a bit rather than downwards, and a bit lower, to reflect light upwards instead of downwards, but whether I'm right or wrong depends on what you prefer,
Thank you Garry. I really appreciate you doing these, and the tips are so helpful. I'll remember the distance for next time, as I do seem to shoot a fair few toys nowadays (y)
 
Thank you for your comments, I think I have misunderstood the light placement so I will try again with the light more to the side and an on axis fill

Chris
 
Thank you Garry. I really appreciate you doing these, and the tips are so helpful. I'll remember the distance for next time, as I do seem to shoot a fair few toys nowadays (y)
This is an approach/ technique that's perfect for this type of subject. If you think that it suits Batman, just think how much better it will be for textured subjects :) i.e. ones that aren't made from shiny plastic.
Thank you for your comments, I think I have misunderstood the light placement so I will try again with the light more to the side and an on axis fill

Chris
For maximum effect, the light doesn't want to be "more to the side", it wants to be from the side, and sometimes slightly behind as well, depending on the effect we want. No fill please, at least not for these challenges. But reflectors, of all kinds, are fine. We're trying to make these challenges work for everyone, not just for those who have more than one light source.
 
This is an approach/ technique that's perfect for this type of subject. If you think that it suits Batman, just think how much better it will be for textured subjects :) i.e. ones that aren't made from shiny plastic.
I'm gonna have to try and find something textured, as most of my toys/models are plastic, albeit some are painted matt ;)
Would this work with old boots etc?
 
It will work with almost anything, and will work best with textured surfaces, and old boots are a perfect subject.
boots_reflector.jpg
 
"For maximum effect, the light doesn't want to be "more to the side", it wants to be from the side, and sometimes slightly behind as well, depending on the effect we want. No fill please, at least not for these challenges. But reflectors, of all kinds, are fine. We're trying to make these challenges work for everyone, not just for those who have more than one light source."

Thanks for that, this is taken with the light from the side and a large (ish) reflector of white foam board
p519053526-5.jpg
 
Much better, but the light was too close to the subject, resulting in more fall-off of light than necessary and less effective reflection - our old friend the Inverse Square Law - does anyone here need that law to be explained?
 
I'll try . . .

Newton's Inverse Square Law applies to all forms of radiated energy - light, sound, heat. It's a theory, and the theoretical basis assumes that
1. The energy source is a point source, i.e. it's small.
2. The energy source is uncontrolled, i.e. it goes in all directions, no reflector or similar
3. It occurs in "free space", i.e. in a vacuum of infinite size, so there is no pollution, no gravity, no reflectors or absorbers, and the space goes on forever.

Now, these conditions never actually exist, so there can be small variations in practice, but basically it's never far off.

The law says that every time we double the distance from the source to the received location (from the light to the subject) 3/4 of the power is lost. So, as an example, if the light is 2' from the subject and the correct exposure is f/16, moving it to 4' requires f/8, and moving it to 8' requires f/4 - 15/16th of the lighting power has been lost by moving the light from 2' to 6'. This isn't a problem, we just increase the lighting power.

So, let's say that the light is 2' from the subject, and the subject is 1' wide - The light hitting the side nearest to the light gets twice as much light than the side furthest away, creating bright light on the lit side and half of that light on the far side, we call that loss of light "fall off", AKA B****y Newton b*******g it up again.
Let's say that we're using a reflector, and that reflector is another foot further away, so the light has to travel a total of 2' to get to the nearest part of the subject and 4' to get to the reflector, so only 1/4 of the lighting power that reaches the lit side of the subject can reach the reflector. The light then needs to reflect back another foot to light the dark side of the subject, that halves the amount of power once more, so the reflected light is very weak. And this assumes that your reflector is a mirror, which should reflect all of the light, if it's a piece of white card or similar, which only reflects about 70% of the light, the loss will be even greater.

So, if the light is close the lighting will be uneven and the reflector won't do much.

If the light is a long way away, the fall-off of light across the width of the subject will be much less, so the lighting will be much more even in intensity, and the reflector will be far more efficient.

Another aspect of the ISL is that if we move the light twice as far away it becomes, in effect, half the size. Less size means that the lighting is harder. And that's another reason why we usually put a small hard light a long way away, and a large light such as a softbox as close as we can. Size and distance work in tandem, if we look at the sun on a clear day it looks small, that's because although it's 865,370 miles in diameter, it's also 93,000,000 miles away, and it creates a very hard light. As the ISL also applies to heat, if we go to somewhere that's closer to the sun, it's hotter there.

I hope this makes sense, if it doesn't then just say so:)
 
Last edited:
Thanks, Garry. I'm going to have a couple of practical hits, to get my head around it a little better. But your explanation dumbs it down enough for me :)
 
My first attempt. My wife bought me some lencarta stuff to take portraits of our dog a year or so ago. We lost him before he could be subjected to the ordeal and its been sat in a box ever since. I dug it out this afternoon.

So this is a lencarta flash unit which came with the aforementioned honeycombs - I used the 10. It was about 8ft away from the plant and the white card used as a reflector was about 12" in this shot. I did have a poor shot with the card closer that has evened out the light but need to move everything to take a usable shot.

DSCF2214.jpg
 
Sorry to hear about your dog. I lost mine a long time ago and, probably rightly, decided that I was too old to get another, but I still miss him.

Good result. Ignore me when I advise getting the reflector really close (and have the light a long way away) - I only do that so that people know how to have a really effective reflector if they want to do so, but it's all about personal choice.
 
Back
Top